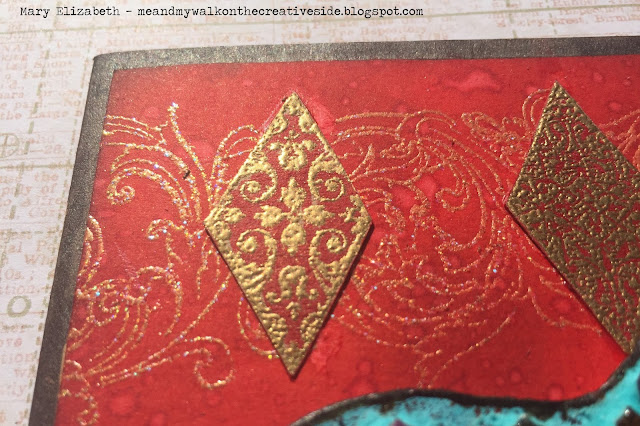
The card background is mixed media paper. I gave it a slight ombre effect by starting with a light coat of Candied Apple Distress Ink, applied with a blending tool, over then entire background. Then applied more coats of Candy Apple to the top third of the card (until I had a very intense red at the top) which then blended into Abandoned Coral in the middle third, which then blended into Carved Pumpkin. Really gorgeous colors!!!!!
After drying the ink with a heat tool, I grabbed one of my favor Tim Holtz stamps of all times( the scrollwork) and applied it to the top and bottom with Distress Embossing Ink. I embossed the scroll work border with Ranger's Enchanted Gold embossing powder. I absolutely loved the vibrant background, but it was almost too vivid to work on (I needed sunglasses). So I toned it down a bit with Vintage Photo Distress Ink around the edges and lightly over the top of the entire background. This made the embossed scrollwork pop a little more. I embossed another of Tim's classics stamps, with regular gold embossing powder, on a separate piece of mixed media paper. I colored the diamonds with a Candied Apple Distress Marker. I fussy cut the diamonds and adhered them to the background with Distress Collage Medium (matte).
I trimmed the card out with a piece of gorgeous gold fiber ribbon that I got in an after-Christmas clearance bin. The sentiment is another Tim Holtz stamp. I used a piece of black card stock embossed with gold embossing powder. I added some gold remnant rubs on the sides of the sentiment and then gave it a coat of Glossy Accents. Finally the entire background got a the "spritz and flick" with water treatment.
Now a little more info about my Moroccan-inspired "glass" tile center piece.
The tiles were made from shrink plastic that I die cut with Tim Holtz's Trellis die. These pieces are the insert pieces left over from the shrink plastic lattice that I used to create the "Moroccan Tiled" texture in my last project. I stamped these left over pieces with a variety of Tim Holtz stamps prior to putting them in oven. After the pieces did their "shrink thing" in the oven, I let them cool. I applied a variety of colors of alcohol ink (on the opposite sides) by just dripping the ink on the side opposite of the stamped image. I used a cotton swab to mop of a little ink if it was too dark or spread ink out evenly.
I thought about adhering the tiles inside a large bezel, but then decided to try another experiment. I die cut one of Tim's labels out of his White substrate sheets. I laid out my tile pattern on it and decided I needed something to cover the edges of the label. I covered the edges with Ranger's Perfect Medium and then heat embossed Turquoise Iced Enamels Relique. Love the metallic and black flecks in it! I edged the embossed label with Ginger alcohol ink to give it some definition.
Next I I covered the interior of the label with about a one-eighth inch thick coat of gloss Transparent Texture Paste. I was able to apply all of my tiles at once and continue to move them around if they weren't lined up the way that I wanted them. Applying the layer of texture paste instead of just using it as a glue (like I did with the Glossy Accents in my last project) allowed for a longer drying time of the medium. It worked like a dream! I let this dry for an hour before coming back to grout it.
The grout is a mixture of Ranger Texture Paste (opaque white) and Dylusions Vibrant Turquoise Spray Ink. I managed to get just about the same hue as the turquoise Iced Enamels. I applied it over the tiles with a palette knife and then used a water-dampened paper towel to wipe away the excess ground from the top of tiles. I used my finger tips and a little water to smooth the texture past out in between the tiles and along the edges. The grout cracked a little bit when flexed the substrate to flatten it out (a more rigid surface like chipboard will be my choice next time). I then added a coat of Glossy Accents to the top of all the tiles. After all of this dried, I adhered the center piece to my card front with foam squares.
I'm going to enter this in Simon Says Stamps Wednesday Challenge -- Anything Goes Challenge because just about everything went on this project :) Thanks for dropping by. Hugs to you all! -- Mary Elizabeth


